 Công nghệ
  Windows
  iPhone
  Android
  Học CNTT
  Download
  Tiện ích
  Khoa học
  Game
Game  Làng CN
  Ứng dụng
Trong bài viết sau, Quản Trị Mạng sẽ giới thiệu với các bạn cách cài đặt webserver Apache2 trên Fedora 14 server cùng với PHP5 và MySQL hỗ trợ. Thuật ngữ LAMP ở đây là từ viết tắt của Linux, Apache, MySQL, PHP.
Tại đây, chúng tôi tiến hành thử nghiệm trên hệ thống có hostname server1.example.com, địa chỉ IP 192.168.0.100. Tùy từng hệ thống khác nhau mà các bạn nên có điều chỉnh thích hợp. Việc trước tiên cần phải làm là cài đặt MySQL 5:
yum install mysql mysql-server
Sau đó chúng ta cần tạo đường dẫn khởi động cho MySQL (do vậy MySQL sẽ tự khởi động cùng hệ thống), và kích hoạt MySQL server:
chkconfig --levels 235 mysqld on
/etc/init.d/mysqld start
Gõ lệnh:
mysql_secure_installation
để khởi tạo mật khẩu cho tài khoản người dùng root (nếu không thì bất cứ ai cũng có thể truy cập cơ sở dữ liệu MySQL của bạn):
[root@server1 ~]# mysql_secure_installation
NOTE: RUNNING ALL PARTS OF THIS SCRIPT IS RECOMMENDED FOR ALL MySQL
SERVERS IN PRODUCTION USE! PLEASE READ EACH STEP CAREFULLY!
In order to log into MySQL to secure it, we'll need the current
password for the root user. If you've just installed MySQL, and
you haven't set the root password yet, the password will be blank,
so you should just press enter here.Enter current password for root (enter for none): <-- nhấn ENTER
OK, successfully used password, moving on...Setting the root password ensures that nobody can log into the MySQL
root user without the proper authorisation.Set root password? [Y/n] <-- nhấn ENTER
New password: <-- mật khẩu SQL root
Re-enter new password: <-- mật khẩu SQL root
Password updated successfully!
Reloading privilege tables..
... Success!
By default, a MySQL installation has an anonymous user, allowing anyone
to log into MySQL without having to have a user account created for
them. This is intended only for testing, and to make the installation
go a bit smoother. You should remove them before moving into a
production environment.Remove anonymous users? [Y/n] <-- nhấn ENTER
... Success!Normally, root should only be allowed to connect from 'localhost'. This
ensures that someone cannot guess at the root password from the network.Disallow root login remotely? [Y/n] <-- nhấn ENTER
... Success!By default, MySQL comes with a database named 'test' that anyone can
access. This is also intended only for testing, and should be removed
before moving into a production environment.Remove test database and access to it? [Y/n] <-- nhấn ENTER
- Dropping test database...
... Success!
- Removing privileges on test database...
... Success!Reloading the privilege tables will ensure that all changes made so far
will take effect immediately.Reload privilege tables now? [Y/n] <-- nhấn ENTER
... Success!Cleaning up...
All done! If you've completed all of the above steps, your MySQL
installation should now be secure.Thanks for using MySQL!
[root@server1 ~]#
Cài đặt Apache2:
Hiện tại, Apache2 đã có sẵn trong các gói cài đặt của Fedora, do vậy chỉ cần sử dụng lệnh:
yum install httpd
và thiết lập tính năng khởi động cùng hệ thống:
chkconfig --levels 235 httpd on
Sau đó khởi động Apache:
/etc/init.d/httpd start
Khởi động trình duyệt và gõ địa chỉ http://192.168.0.100, các bạn sẽ thấy trang kiểm tra ban đầu của Apache2 như sau:
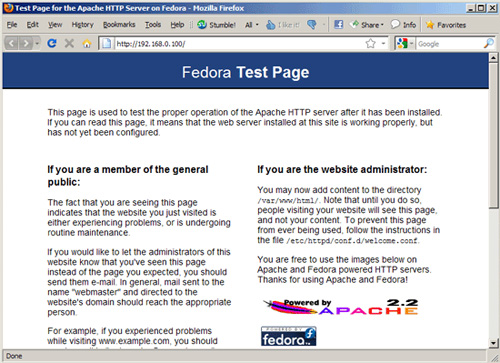
Thư mục tài liệu root mặc định của Apache là /var/www/html trên Fedora, và file cấu hình /etc/httpd/conf/httpd.conf, ngoài ra, các file thiết lập khác đều được lưu trữ tại thư mục /etc/httpd/conf.d/
Cài đặt PHP5:
Để cài các module cần thiết của PHP5 và Apache PHP5, các bạn sử dụng lệnh sau:
yum install php
Sau đó phải khởi động lại Apache:
/etc/init.d/httpd restart
Việc tiếp theo cần làm là kiểm tra lại quá trình cài đặt PHP5 trên. Tất cả tài liệu root mặc định của website được lưu tại /var/www/html. Ngay sau đây, chúng ta sẽ tạo 1 file PHP nhỏ (info.php) trong thư mục đó và gọi ra bằng trình duyệt. File này sẽ hiển thị tất cả các thông tin hữu ích về toàn bộ quá trình cài đặt PHP, cũng như phiên bản và 1 số chi tiết khác:
vi /var/www/html/info.php
<?php
phpinfo();
?>
Khởi động trình duyệt, và gõ địa chỉ http://192.168.0.100/info.php:
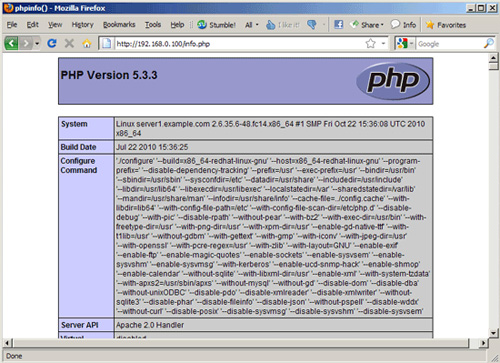
Nếu hệ thống của bạn hiển thị kết quả như trên, nghĩa là PHP5 đã hoạt động, và thông qua trình điều khiển Apache 2.0 Handler, thông tin này được hiển thị tại dòng Server API. Khi xem thêm, bạn sẽ thấy hầu hết các module đều đã được kích hoạt trong PHP5, nhưng thiếu mất MySQL, nghĩa là PHP5 không hỗ trợ MySQL.
Điều chỉnh MySQL hoạt động với PHP5:
Về bản chất, để thiết lập MySQL tương thích với PHP5, chúng ta cần cài đặt thêm gói php-mysql hỗ trợ. Bạn có thể tìm kiếm các module PHP5 thích hợp như sau:
yum search php
Chọn lấy 1 kết quả bất kỳ và cài đặt như bình thường:
yum install php-mysql php-gd php-imap php-ldap php-odbc php-pear php-xml php-xmlrpc php-eaccelerator php-magickwand php-magpierss php-mbstring php-mcrypt php-mssql php-shout php-snmp php-soap php-tidy
Sau đó, khởi động lại Apache2:
/etc/init.d/httpd restart
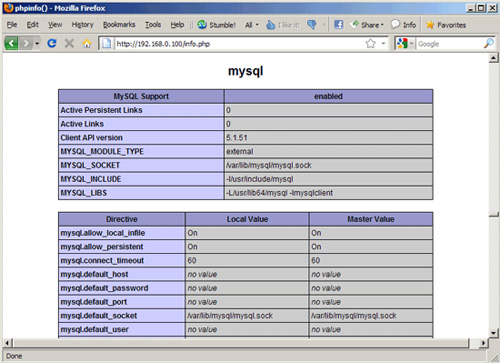
Kiểm tra lại bằng trình duyệt (http://192.168.0.100/info.php), lần này bạn sẽ thấy module MySQL đã xuất hiện:
1 công cụ không thể thiếu để điều khiển cơ sở dữ liệu MySQL là phpMyAdmin, các bạn cài đặt ứng dụng này bằng lệnh:
yum install phpmyadmin
Tiếp theo, chúng ta cần cấu hình lại phpMyAdmin bằng cách thay đổi thiết lập của Apache để chấp nhận các kết nối từ mọi nơi, không chỉ từ localhost (chỉnh lại cú pháp <Directory /usr/share/phpMyAdmin/>):
vi /etc/httpd/conf.d/phpMyAdmin.conf
# phpMyAdmin - Web based MySQL browser written in php
#
# Allows only localhost by default
#
# But allowing phpMyAdmin to anyone other than localhost should be considered
# dangerous unless properly secured by SSLAlias /phpMyAdmin /usr/share/phpMyAdmin
Alias /phpmyadmin /usr/share/phpMyAdmin#<Directory /usr/share/phpMyAdmin/>
# Order Deny,Allow
# Deny from All
# Allow from 127.0.0.1
# Allow from ::1
#</Directory><Directory /usr/share/phpMyAdmin/setup/>
Order Deny,Allow
Deny from All
Allow from 127.0.0.1
Allow from ::1
</Directory># These directories do not require access over HTTP - taken from the original
# phpMyAdmin upstream tarball
#
<Directory /usr/share/phpMyAdmin/libraries/>
Order Deny,Allow
Deny from All
Allow from None
</Directory><Directory /usr/share/phpMyAdmin/setup/lib/>
Order Deny,Allow
Deny from All
Allow from None
</Directory># This configuration prevents mod_security at phpMyAdmin directories from
# filtering SQL etc. This may break your mod_security implementation.
#
#<IfModule mod_security.c>
# <Directory /usr/share/phpMyAdmin/>
# SecRuleInheritance Off
# </Directory>
#</IfModule>
Sau đó khởi động lại Apache:
/etc/init.d/httpd restart
Nếu thành công, các bạn có thể truy cập và sử dụng phpMyAdmin qua địa chỉ http://192.168.0.100/phpmyadmin/:

Trên đây là 1 số thao tác cơ bản để cài đặt cũng như cấu hình, thiết lập Apache2, PHP5 và MySQL trên nền tảng Fedora 14 (LAMP). Chúc các bạn thành công!
Một số đường đẫn tham khảo: Apache, PHP, MySQL, Fedora và phpMyAdmin.


 Linux
Linux  Đồng hồ thông minh
  Chụp ảnh - Quay phim
  macOS
macOS  Phần cứng
  Thủ thuật SEO
  Kiến thức cơ bản
  Dịch vụ ngân hàng
  Lập trình
  Dịch vụ nhà mạng
  Dịch vụ công trực tuyến
  Nhà thông minh
  Quiz công nghệ
  Microsoft Word 2016
  Microsoft Word 2013
  Microsoft Word 2007
  Microsoft Excel 2019
  Microsoft Excel 2016
  Google Sheets - Trang tính
  Code mẫu
  Photoshop CS6
  Photoshop CS5
  Bootstrap
  Ứng dụng văn phòng
  Tải game
  Tiện ích hệ thống
  Ảnh, đồ họa
  Internet
  Bảo mật, Antivirus
  Họp, học trực tuyến
  Video, phim, nhạc
  Giao tiếp, liên lạc, hẹn hò
  Hỗ trợ học tập
  Máy ảo
  Điện máy
  Tủ lạnh
  Tivi
Tivi  Điều hòa
  Máy giặt
  Quạt các loại
  Cuộc sống
  Kỹ năng
  Món ngon mỗi ngày
  Làm đẹp
  Nuôi dạy con
  Chăm sóc Nhà cửa
  Du lịch
  Halloween
  Mẹo vặt
  Giáng sinh - Noel
  Quà tặng
  Giải trí
  Là gì?
  Nhà đẹp
  TOP
TOP  Ô tô, Xe máy
  Giấy phép lái xe
  Tấn công mạng
  Chuyện công nghệ
  Công nghệ mới
  Trí tuệ nhân tạo (AI)
  Anh tài công nghệ
  Bình luận công nghệ